Create a collection
You can create a collection in just a few clicks.
|
Notes:
|
- From the Collections homepage, select PRIVATE > Create Collection +.

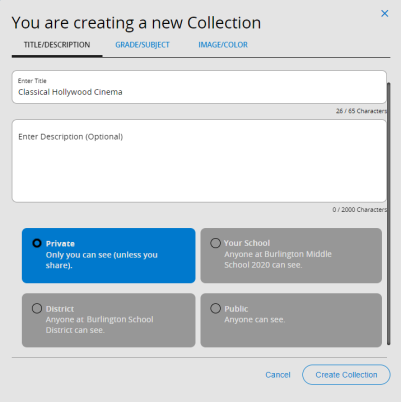
A pop-up appears.

- On the TITLE/DESCRIPTION tab, do the following:
- Enter a title for this collection. The title appears on the Collections homepage and when you open the collection.
- Enter a description for this collection (optional). The description appears only when you open the collection.
- Select a visibility for this collection. The default visibility is Private, but you can make the collection available to others in your school or district, or anyone you choose.
Notes:
- Some of the visibility options might not be available to you, depending on your role.
- If you select Your School, only people at your school can see your collection.
- If you select District, only people in your school district can see your collection.
- If you select Public and you are not a student, anyone can see your collection.
- If you select Public and you are a student, anyone can see your collection except guests and anonymous users.
- Visibility is based on the viewer's location. A shared collection created by someone at your school appears on your school carousel. A shared collection created by someone in your district, but not your school, appears on your district carousel.
- After you add a title, description, and visibility, do any of the following:
- If you are done entering collection details, click Create Collection.
- If you want to add grade and subject information, click the GRADE/SUBJECT tab, and then make your selections.
- If you want to add an image and color, click the IMAGE/COLOR tab, and then make your selections.
To customize the collection image, scroll to select a stock image, or click UPLOAD IMAGE to add your own.
Notes:
- To resize the image, move the scroll bar left or right until the image fits in the window.
- To delete the image, click REMOVE IMAGE.
To choose a color for your collection, click the desired swatch.
|
Note: You can click Create Collection at any time. Once you create a collection, you can add resources to it. |